
getting started
Get your first machine monitored in under 5 minutes.
step 1: create an account
- Go to owlette.app
- Click Register and create an account with email/password or Google sign-in
- Set up two-factor authentication. It's required, and either option satisfies it on its own:
- a passkey (Windows Hello, Touch ID, Face ID, a security key, or a password manager like 1Password) signs you in and clears 2FA in one step, with no code to type
- an authenticator app gives you 6-digit codes — these run on desktop as well as mobile, so you don't need a phone
- Save the backup codes you're shown at the end — they're how you get back in if you lose the device
step 2: create a site
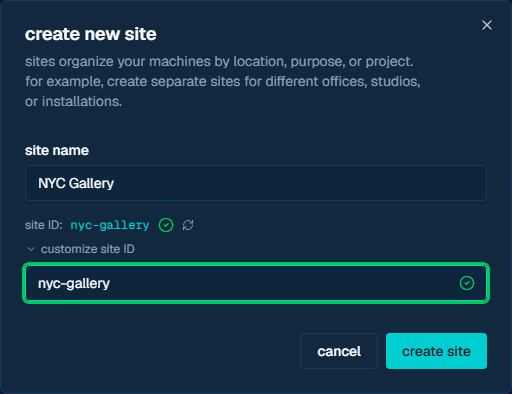
Sites organize your machines — think of them as locations, departments, or projects.
- Click "new site" in the dashboard (or "Create Your First Site" from the empty state)
- Enter a site name (e.g., "NYC Gallery", "Main Office")
- The site ID is auto-generated from the name — expand "customize site ID" only if you want to set a specific ID
- Click "create site"
step 3: install the agent
download
The dashboard header has two installer buttons side by side — pick the one that matches where you are:
- download — if you're already working on the machine you want to monitor, click this to download the latest installer directly.
- copy link — if you're remoting into the machine, click this to copy the installer link, then paste it into a browser on that machine to download it there — no file transfer needed.

install & connect
- Run the installer as Administrator on your target machine
- Follow the setup wizard
- The owlette window opens on join a site, showing a pairing phrase (3 random words), the authorization link, and which owlette server it belongs to
- Click open owlette.app/add in that window to authorize from this machine, then select a site and click "Authorize"
- Or authorize from a phone or another computer by opening the displayed URL and entering the pairing phrase
- The agent receives credentials and connects — done
Bulk deployment
For deploying to many machines, use the /ADD= flag with a pre-authorized phrase from the dashboard. See Installation → Silent Install.
step 4: verify
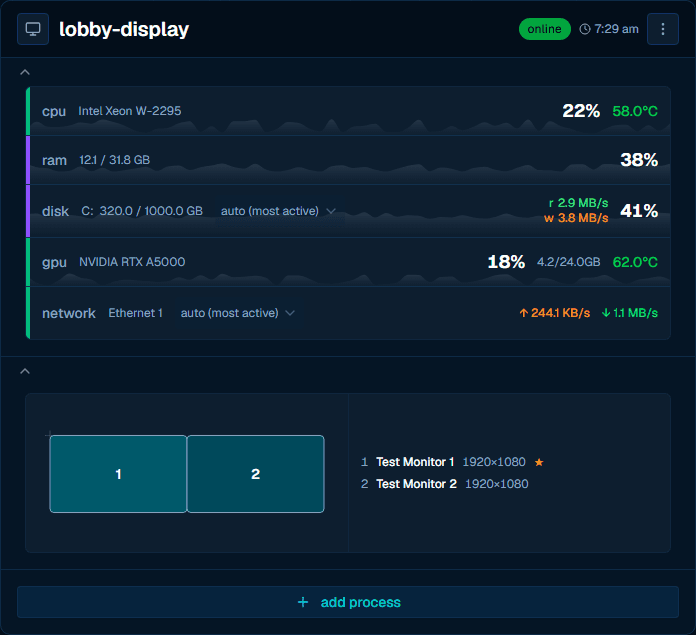
Within 30 seconds of installation, your machine should appear in the dashboard:
| check | what to look for |
|---|---|
| Machine visible | Machine card appears in your site with a green "Online" indicator |
| Metrics flowing | CPU, memory, disk percentages updating |
| System tray | Owl icon visible in the Windows notification area |
step 5: add processes to monitor
Now that your machine is connected, tell owlette which applications to watch:
- Click on your machine in the dashboard
- Click "Add Process"
- Enter the executable path (e.g.,
C:\Program Files\Derivative\TouchDesigner\bin\TouchDesigner.exe) - Give it a name (e.g., "TouchDesigner")
- Enable Autolaunch to auto-start and auto-restart on crash
- Click Save
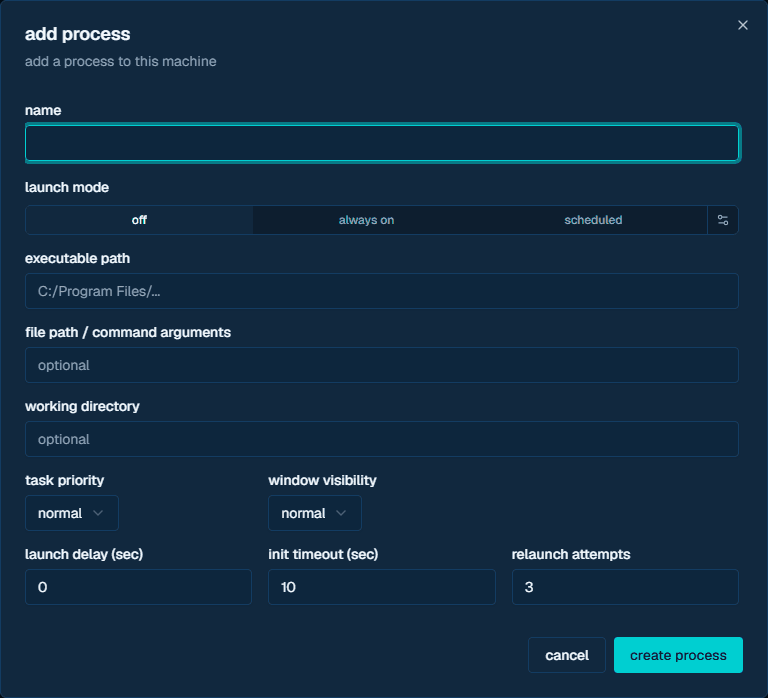
The agent immediately begins monitoring the process. If it crashes, owlette restarts it within 10 seconds.
what's next?
You're up and running. Here's what else you can do:
- Configure process settings — Priority, visibility, launch delay, crash limits
- Deploy software remotely — Push installers to machines without physical access
- Sync files with roost — Publish versioned files and sync them to target machines
- Chat with your machines — Use hoot to query and control machines via natural language
- Set up email alerts — Get notified when machines go offline or processes crash
- Add more machines — Scale out to your full fleet
- Invite team members — Add users with role-based site access
need help?
- Check the Troubleshooting guide for common issues
- Review Agent Troubleshooting for agent-specific problems
- Open an issue on GitHub
- Email us at support@owlette.app
docs
start here for owlette setup, api, cli, sdks, and release notes.
agent
The owlette agent is a Python Windows service that runs in the background, monitoring your processes, collecting system metrics, and syncing everything to the cloud. It's the core of the owlette system — every machine you want to manage needs an agent installed.